Showing posts with label Blogging Tips. Show all posts

How to create a Menu Bar in Blogger in a Simple way

Ways to create Menu Bar 


Creating a menu bar with Blogger

  1. To create a menu bar, go to your blogger overview screen and click on pages.
  2. Type New page. Create and publish the pages you need (i.e. About, Contact, etc.).
  3. Then go into LAYOUT, and click on the pages widget and customize your options.
  4. If you want Blogger to pull up a category archive of posts, there will be an option that says, ADD A LINK PAGE. Then you can type in the direct URL of the labeled posts so it pulls an archive. This post explains how to find that URL. In essence, it’s http://yourdomain.blogspot.com/search/label/labelname. 

How to Make free 5000+ Backlinks From Different Website Automatically

IM TALK Website Submitter

The IM Talk website claims that to give the 3000 backlinks on just on click and its free and automated service. You just put your Blog | website URL and some other Detail to make free backlinks. For more Detail check How to make Free Backlinks with IM TALK. There are not high page rank backlinks but they will allow to your blog | website to get indexed regularly and fast.

Free Auto Backlink Generator Pages

Get free 240 backlinks using the free auto Backlinks Generator Pages easily. The website claims for 240 backlinks. So try to use it.

Backlinks Builder free

Make 100+ free backlinks with Automatically Backlinks Builder just add your Blog | website then you can make easily 100+ backlinks easily.

Backlink Generator Free 323 Backlinks

Try Use this free backlink Generator to get easily 323 backlinks for your Blog | website. I have also make backlinks from this website.

Auto Free Backlink Generator

Its free and auto service to make lot of backlinks easily and free auto Backlink Generator . I think it’s generates 100 backlinks for your blog.
 

How To Optimize Your Blog Post Titles for Better SEO Friendly

The reason most of the blogger templates aren’t that SEO friendly because templates available in Blogger were designed long ago and haven’t been updated, probably since 2007, since then Google SEO algorithm has changed a lot and as being on blogger you don’t want to be left long away, to keep up with the competition making your Blogger template SEO friendly is very important and so this small SEO related article will help you to leave your competitors behind.


If you are also using a template from Blogger then you need to make some changes on it to fit your needs and also to fit the search engine needs. Normally search engine don’t focus on the markup importantly but it’s a good thing to change it to something user friendly. What Blogger templates like ‘Simple’, Travel’ etc. have h1 tag as it’s Blog title, which is normal. But the Post title is not okay that all, it is in an h3 tag, for many reasons your blog might not being shown up in the search results and this is on of those reasons.
You won’t find any difficulties with a WordPress theme, as they are freshly published and reviewed by experts but templates in Blogger were made by expert but not freshly launched. Just as the search engines detects an anchor link because of it’s markup then why can’t they see what heading is being used for what area.

OPTIMIZE THE POST TITLE TO HEADING2 IN BLOGGER

Enough about it’s effect, let’s talk about how to make the changes applicable. These easy instruction will give you the easiest way to turn your post title to h2 from h3.
  1. First of all login to your Blogger Dashboard
  2. Go to the Template tab and click on Edit HTML, ignore the warning and proceed.
  3. Check mark the ‘Expand Widget Template’
  4. Use CTRL+F and search for this line
    <h3 class='post-title entry-title' itemprop='name'>
  5. All you have to do is just change the <h3> to <h2>, change of only a number. But we aren’t done yet, remember there’s still an ending/closing tag. You have to change both starting <h3> and ending</h3> tag into the template. In the middle it’s all XML codes that works on the server to serve an HTML page.
    Changing the closing and starting h3 tag
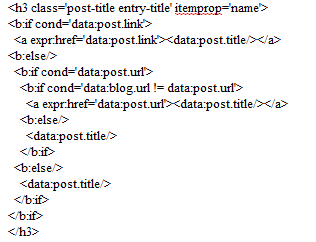
After you turn the starting h3 to h2, do remember to change the ending tag too or it will create difficulties while saving the template.
  6. You will find the tag two times. one is for Desktop Version Template and another is for Mobile version Template. I recommend you to change all h3 that marks as the post title to h2. Searching for <h3 will bring up the codes but as i already said, remember to change corresponding closing tag too.
Yeah that’s it ! It doesn’t only increase visibility and beauty of your blog in search results but also make your blog user friendly. Now stop using h3 for your post title, h3 is only good in the post body for heading. This was not a big change or addition for better SEO in your blog but remember it is how SEO works, there’s no easy and direct way to get to the top of search results, small and effective actions you take regarding your blog makes it a hit on SEO and search engines.
Don’t get worried if your blog don’t do too good in the search results, keep posting and that’s the most important aspect in getting to the top. And this blog is always free to read, check post related to Blogger SEO for some more amazing post and do subscribe for our coming posts.

Here Is 3 FREE SEO Plugins For Your Blog Must Use It

I would like to share 3 valuable wp plugins:

SEO No Duplicate – This plugin helps you manage your search engine duplicate content, by setting your post page’s canonical to the permalink.

Broken Link Checker
– This plugin will check your posts, comments and other content for broken links and missing images, and notify you if any are found.

Redirection Plugin - Acts as an even better solution to the 404 (broken links) problem. Redirection is a WordPress plugin to manage 301 redirections and keep track of 404 errors without requiring knowledge of Apache .htaccess files.

Get Auto Blogs [ Readymade Blog ] with 200+ articles already posted - Grab It And Make Money

These Blogs are guaranteed to go through Ice, Hail or Snow; powered to dominate!

What’s up for grabs?

• A Minimum of 200 articles are already posted
• Additionally, 3 articles per week will be automatically posted for the next 4 years
• Page Content with relevant articles from ArticleBase.com
• Adsense Ads incorporated
• Easy Installation Manual
• Easy to customize

Plugins installed as follows:

• All in One SEO Pack
• Dagon Design Sitemap Generator
• Easy Privacy Policy
• Featured Content Gallery
• Fixed Social buttons
• Google XML Sitemaps
• KB Robots.txt
• WordPress Importer

Available in 10 Different Niches:

• Business
• Ecommerce
• Education
• Forex
• Insurance
• Loans
• Pets
• Self Improvement
• Weight Loss
• Yoga

License:

> Personal Use Only!


SCREENSHOTS


Starting At $19.95


How To Increase keyword density and improve your blog & website SEO

 
It’s important to increase keyword density of your post.The important factor apart of having best SEO wordpress theme and the best wordpress seo plugin, that will bring your blog ranks high in Search engine result page (we can say, to make your post appear in the first page of Google) is your keyword density.
I said, it is important because keywords of your post is like a clue for Google bot, what your post is all about.
So basically, keyword density is the percentage of repeating words or phrases in your post compared with the other text in the same page or post.

Having a relevant phrases in your post will result you being in the first or second page of Google.
Very neat, especially if you are targetting some posts for your coming customers.
If yours is too low, you can increase keyword density by adding some phrases that are relevant with your post’s content.

Things to remember before you increase keyword density of your article.

1. Do not increase keyword density too much keywords or over stuffing phrases, because it is considered as spams.
What does too much keywords means? it means that try to avoid not to repeat specific phrases too frequent in your blog.
2. The ideal of keyword density is about 2 until 4%. So if you have below or above this percentage, you can then decrease or increase keyword density.
increase keyword density
3. Hyperlinking between one article to another one with anchor text works together with the replacement of your keywords phrases.
Those three points are significant before we increase keyword density of our articles.

To Increase keyword density, do it efficiently.

You probably can increase keyword density of your post manually, but according to my experience, the best way to increase keyword density in wordpress blog, is by using SEOpressor plugin, as the best wordpress SEO plugin.
How i use SEOpressor plugin.
blog seo This plugin can really save your valuable time, by scoring and notifying you inside your dashboard about your keyword density, including to increase keyword density percentage of your post’s SEO.
I have reviewed this plugin in this best wordpress seo plugin post, and i am using it for this blog as well, to decrease or increase keyword density of my blog post.
 

How To Add Facebook Comments Box To Blogger Blog's Post


1. If you wish to completely hide the blogger comments form then read Replace Blogger comments form With Facebook

2. Show both Facebook and Blogger Comments inside Tabs!


facebook-comments-boxIn 2009 Facebook developers introduced their best social plugin called "Facebook Comments Box". This plugin can be embedded in any website or blog and visitors can use their IDs of Facebook, Yahoo, AOL or Hotmail to leave a comment at your site. This plugin did show a lot of problems when it was embedded in Blogger Blogs in initial days of its development but now thanks to our fellow friend Max from Allblogtools this plugin has been finally bloggerized to work just perfect with any Blogger hosted blogs. I have edited Max's coding in some areas and have mentioned some more interesting options that will help you use the Facebook comments box in parallel to your old Blogger Comment form so that you may loose no previous comments and provide users with multiple options of commenting from different platforms.


Live Demo

This is how the Facebook Comments box looks like,
LIGHT SCHEME
facebook-commentS-box LIGHT

DARK SCHEME
Facebook-comments-dark-scheme

Interesting? Lets now learn how to embed this extremely useful comment form in Blogspot blogs. Kindly follow the simple steps below,

1- Get a Facebook Application ID

  1. Go To Facebook Developers Page
  2. Submit your blog URL and give it a name. Keep Site name as your "Blog Title" and Site URL as your "blog address"
site-url
3. Hit "create app" button and proceed
4. After submitting the security check code you will see this page,
app-id
5. Save that App ID in a notepad because we will need that latter. Now Click the link near the top-right corner of the same page that says "Developer Dashboard"
image
6. One the new window that appears click the Edit Settings link ,
edit-settings
7. Then go to Website option and write your Site Domain as blogspot
website
8. Save Changes and jump to the next step of this tutorial

2- Adding the Facebook comments Box to Blogger

Now its time to do embed the comments box in your blog templates. So follow these easy steps,
PS: Please make sure your blogger comment form is embedded below posts. For doing this first go to Blogger > Settings > comments > and then choose embed comments below posts. After doing this follow the tutorial below.
  1. Go To Blogger > Design > Edit HTML
  2. Backup your template
  3. Check the "Expand Widget Templates" box
  4. Search for <html and just after it give a space and add this code,
xmlns:fb='http://www.facebook.com/2008/fbml'
  5.  Next search for 
<body>
Note: In New Blogger Designed templates the same code looks like this,
<body expr:class='&quot;loading&quot; + data:blog.mobileClass'>
Find any one of these codes and just after it paste the code given below,
< div id='fb-root'/>
< script>
window.fbAsyncInit = function() {
FB.init({
appId : &#39;YOUR_APP_ID&#39;,
status : true, // check login status
cookie : true, // enable cookies to allow the server to access the session
xfbml : true // parse XFBML
});
};
(function() {
var e = document.createElement(&#39;script&#39;);
e.src = document.location.protocol + &#39;//connect.facebook.net/en_US/all.js&#39;;
e.async = true;
document.getElementById(&#39;fb-root&#39;).appendChild(e);
}());
< /script>


  • Replace YOUR_APP_ID with your Facebook application ID that you saved in a notepad.
6. Next search for </head> and just above it paste the following code,
< meta expr:content='data:blog.pageTitle' property='og:title'/>
< meta expr:content='data:blog.url' property='og:url'/>
< meta content='MY Blogger Tricks' property='og:site_name'/>
< meta content='BLOG-LOGO-IMAGE-LINK' property='og:image'/>
< meta content='YOUR_APP_ID ' property='fb:app_id'/>
< meta content='http://www.facebook.com/mybloggertricks' property='fb:admins'/>
< meta content='article' property='og:type'/>


Make these changes:
  • Replace MY Blogger Tricks with your blog title/Name.
  • Replace BLOG-LOGO-IMAGE-LINK with the image link of your logo. Your logo will look good if it is in gif format and having this size -> 40px by 40px . This logo will appear next to your post title on Facebook profiles of your visitors like this,
logo

  • Replace YOUR_APP_ID with the your Facebook Application ID that you saved in notepad
  • Replace http://www.facebook.com/mybloggertricks with your Facebook user profile link
7. Now Search for this,
< b:includable id='comment-form' var='post'>
8. Just after it paste the code given below,
< b:if cond='data:blog.pageType == &quot;item&quot;'>
< div style='padding:0px 0px 0px 0px; margin:0px 0px 0px 0px;'><script src='http://connect.facebook.net/en_US/all.js#xfbml=1'/>
< div> <fb:comments colorscheme='light' expr:href='data:post.url' expr:title='data:post.title' expr:xid='data:post.id' width='520'/></div>
< div style='color:#fff; background-color:#3B5998;border: solid 1px #ddd; font-size:10px; padding:3px; width:510px;'>Facebook Blogger Plugin: Bloggerized by <b><a alt='blogger templates' href='http://www.allblogtools.com/' style='text-decoration:underline; color:#fff;' target='_blank' title='blogger templates'>AllBlogTools.com</a></b> Enhanced by < b><a alt='blogger widgets' href='http://www.mybloggertricks.com/' style='text-decoration:underline; color:#fff;' target='_blank' title='Blogger Widgets'>MyBloggerTricks.com</a></b></div></div>
< /b:if>
  • If you want to use the dark scheme then simply replace light with dark
  • To change the Comments box size, change this value width='520'
  • To change the footer credits size, change this value width:510px
  • Keep a difference of 10 pixels between the box size and footer size. For example if you set box-size to width='600' then set footer-size to width:590px

9. Save your template and Bingo you are Done! See your blogs to find a beautiful comment box waiting to be touched. =)

How To Add Smooth Scroll to Top Button with Jquery to Blogger

In previous Plugin, the Scrolling Starts from bottom with a Certain speed and Maintains Same speed till to reach top of web page
But in this plugin the Scrolling Starts from bottom with a Certain speed and it Ends with Gradually Decreases the speed. this effect is looks more attractive.
Demo
Scroll this page to Bottom and See Demo at bottom right

How to Add Smooth Scroll to Top with Jquery ?

there are 2 Simple Steps
Step 1: Adding Jquery JavaScript Plugin(Ignore this step if your blog have already a Jquery Plugin)
  1. Go to Blogger Dashboard < Design tab > Edit Html
  2. Search for </head> tag
  3. Add below line of code Before </head> tag
    <script src="https://ajax.googleapis.com/ajax/libs/jquery/1.8.2/jquery.min.js" type="text/javascript"></script>
Step 2: Adding Scroll to Top Script
  1. Go to Blogger Dashboard < Design tab > Edit Html
  2. Search for </head> tag
  3. Add below section of code Before </head> tag and Save your Template.
    <style type="text/css">
    #w2btoTop {display:none;text-decoration:none;position:fixed;bottom:10px;right:10px;overflow:hidden;width:51px;height:51px;border:none;text-indent:-999px;background:url(http://2.bp.blogspot.com/-oVa1ImctF7c/Tdouv3K7NyI/AAAAAAAAA38/xT4bu8uKM3M/way2blogging.org.ui.totop.png) no-repeat left top;}
    #w2btoTopHover {background:url(http://2.bp.blogspot.com/-oVa1ImctF7c/Tdouv3K7NyI/AAAAAAAAA38/xT4bu8uKM3M/way2blogging.org.ui.totop.png) no-repeat left -51px;width:51px;height:51px;display:block;overflow:hidden;float:left;opacity: 0;-moz-opacity: 0;filter:alpha(opacity=0);}
    #w2btoTop:active, #w2btoTop:focus {outline:none;}
    </style>
    <script src="http://widgets.way2blogging.org/blogger-widgets/w2b-jquery.ui.totop.js" type="text/javascript"></script>
    <script type="text/javascript">
    /*<![CDATA[*/
    ;(function($){$().UItoTop({easingType:'easeOutCirc'});})(jQuery); 
    /*]]>*/
    </script>
You Are Successfully Done!
Leave your Comments and Responses about this Widget!

How to Display Your Scripts and Codes in Blogger Posts

How to display the Scripts and Codes in blogger post To show codes in blogger post in special section.
Suppose we want to show a simple code like bellow
< h1> Related posts </h1>
but it is HTML Code so it will display like bellow.

Related postsTo avoid this we show codes in special Section amd make it friendly to post
Just follow these steps
  1. Login to Blogger dashboard
  2. Go to Design Section
  3. Then select Edit HTML tab
  4. Find ]]></b:skin> tag
  5. Paste it above Code of section
    .codeview {
    margin : 15px 15px 15px 35px;
    padding : 10px;
    clear : both;
    font-family : "Courier New", "MS Sans Serif", sans-serif, serif;
    line-height:1.6;
    background: url('https://blogger.googleusercontent.com/img/b/R29vZ2xl/AVvXsEih-YcVqpgr8FOR62hee0Q8r-WF2Wgg3T0WWMoKngvMws0r2AR3DZK-Y0nNy7NlmnKkPN-wlJekmTNNw7m-54R0xo6Iu1UNBjbYeDbCXvetEUURGRaavoUkW8Lq_ccmok1UVYcqnwHHAMH7/') no-repeat scroll bottom right #EFFBF5; 
    border-top : 1px solid #eeeeee;
    border-right : 2px solid #cccccc;
    border-bottom : 2px solid #cccccc;
    border-left : 1px solid #eeeeee;
    }
    .codeview li {
    line-height : 24px;
    color : #333333;
    margin : 0;
    padding : 0;
    }
    ]]>
  6. Now save your template.
While creating any Post, If you want to show the special Code in post that CSS code or JavaScript code, what ever may be , Go to Edit HTML tab in Post and create Div section and put your code in Div section like bellow and publish Your Post.
<div class="codeview">

<!-- Put Your Special code here -->

</div>
Note:- Before Putting code, Make it Friendly to post Using these tools

a sample preview
.codeview {
margin : 15px 15px 15px 35px;
padding : 10px;
clear : both;
font-size:normal;
list-style-type : none;
font-family : “Courier New”, “MS Sans Serif”, sans-serif, serif;
background: url(‘https://blogger.googleusercontent.com/img/b/R29vZ2xl/AVvXsEih-YcVqpgr8FOR62hee0Q8r-WF2Wgg3T0WWMoKngvMws0r2AR3DZK-Y0nNy7NlmnKkPN-wlJekmTNNw7m-54R0xo6Iu1UNBjbYeDbCXvetEUURGRaavoUkW8Lq_ccmok1UVYcqnwHHAMH7/’) no-repeat scroll bottom right #EFFBF5;
border-top : 1px solid #eeeeee;
border-right : 2px solid #cccccc;
border-bottom : 2px solid #cccccc;
border-left : 1px solid #eeeeee;

}
.codeview li {
font-size : 13px;
line-height : 24px;
color : #333333;
font-weight : normal;
margin : 0;
padding : 0;
}

How To Make Money Through Blog Blog Or Website

Many people searching about that how to make money by this n this n whteva..... Now you are in right place here i tell you how to make money through website or blog.
If your blog̢۪s content promote products or review some products, then Chitika is a must try ad networks.
Payment: Paypal and checks.
Minimum Payout: $10 for Paypal, $50 for checks.
It is a advertiser and publisher program -
In advertiser section you can advertised your website or blog for more impressions and traffic
In publisher section which is the main i m talking about , where you can earn money by publishing ads of other peoples , more ads you include more money you earn.and more people you refer than it is double.
Here is simple and easy steps
Sign up for this site Chitikka
Follow the instructions whatever it is says

If You Have Any Problem , Comment Below:-

And there is many legal sites like chitika:-
Infolinks , Google adsence , Text Link ads

How To Get 35000 Free Backlinks To Your Blog Or Website


Backlink is incoming link to your website. This is most important factor to get better rank on search engines. It is not easy to get backlink from other site especially when you create new (newbie) So if you want to get better rank on search engine and get indexed fast. You should create relevant backlink to your website. Search Engines will add more credit to any websites that have a better number of quality backlinks, and consider those websites more relevant and popular than others for a search query in their results pages.
How to create backlink? Link Exchange is one of the option. A relevant and quality backlink according to your keyword or nichee is better than a rubish backlink. Dont link exchange with site that not related to your website. If you website is about pet, link exhchange with pet site. If your site about music, then link exchange with music site and so on. This easy tips can boost your website on search engine. They are many way to building backlink.

More Backlinks = High Ranking In Search Engines = More Website Traffic = High Alexa Ranking = Money and Money.
More Backlinks = High Ranking In Search Engines = More Website Traffic = High Alexa Ranking = Money and Money. - See more at: http://www.trickyarea.com/2011/06/get-4000-backlinks-for-your-website-or.html#sthash.gla9zsoI.dpuf
There is many sites or tools which give you free and thousands of backlinks at one time you only have to do is register or enter the url of your site or blog.

Instant Backlink Bulder

Refreshlist

Ruby Web Links


  • Click on the link provided above, you will see a page with a blank field for entering the Domain Name (Website/Blog Url).
  • So write your domain name there in the form of http://www.yourwebsitename.com. If you are having a blog then the format will be http://www.yourblogname.blogspot.com.
  • You can leave the keyword field and Limit the number of created pages field blank as it is optional.


800 Premium Backlinks


  • Open the website by clicking on the link provided above. When the website will open, you will will see a blank field for entering the Domain Name.
  • So write your Domain Name there in the form of www.yourwebsitename.com. If you are having a blog then you have to write it in the form www.yourblogname.blogspot.com.


600 Premium Backlinks


  • Click on the link provided above. The website will open and you will see a blank field for entering the Domain Name in front of 'http://www.'.
  • You have to write your domain name in that field only in the form of yourwebsitename.com/. If you are having a blog then the format will be yourblogname.blogspot.com/.
- See more at: http://www.trickyarea.com/2011/06/get-4000-backlinks-for-your-website-or.html#sthash.gla9zsoI.dpuf
Webmasterdeck.com


  • Click on the link provided above, you will see a page with a blank field for entering the Domain Name (Website/Blog Url).
  • So write your domain name there in the form of http://www.yourwebsitename.com. If you are having a blog then the format will be http://www.yourblogname.blogspot.com.
  • You can leave the keyword field and Limit the number of created pages field blank as it is optional.
- See more at: http://www.trickyarea.com/2011/06/get-4000-backlinks-for-your-website-or.html#sthash.gla9zsoI.dpuf